Project Overview
TL;DR
CartCockpit is an Arduino sketch that transforms an Arduino Uno/Nano into a digital dashboard for golf carts. Some of this program’s notable features include: a speedometer, an odometer, a trip computer, a battery monitoring system that tracks the state and health of the cart’s batteries, automatic lighting, and a smart range estimation system that learns how the cart is driven and adjusts its estimates over time. I started this project because I have always been interested in user interfaces and car dashboards, and I wanted to take a stab at developing one of my own. Unfortunately, because of time constraints and my departure for school, I have been unable to implement this project into an actual golf cart as of now, however I have posted this project to my GitHub in hopes that someone with more expertise in electrical and mechanical engineering will discover this project and develop a way to implement it into their golf cart.
Why I Took On This Project
The instrument cluster of a car is the main way that it relays information to the driver, and the way it is designed can have a big impact on what information the driver receives and how they interpret it. This kind of thing is right up my alley, for I am somewhat obsessed with the things that involve humans and machines communicating with each other; even as a young child, I always enjoyed looking at the various instrument panels in different cars and paying close attention to the decisions made by the designers of these panels. I always wanted to take a stab at designing my own one day, so when I finally gained the skills and knowledge required to design an instrument cluster, I did so, and the result of that endeavor was this project.
Features
When making this project, I tried to incorporate much of the functionality present within car instrument clusters; while it was challenging to get all of these features running at once on a lowly Arduino Uno/Nano, I believe that I succeeded in developing a robust set of features for this project. Some of the more notable features of this program are listed below:
Speedometer & odometer
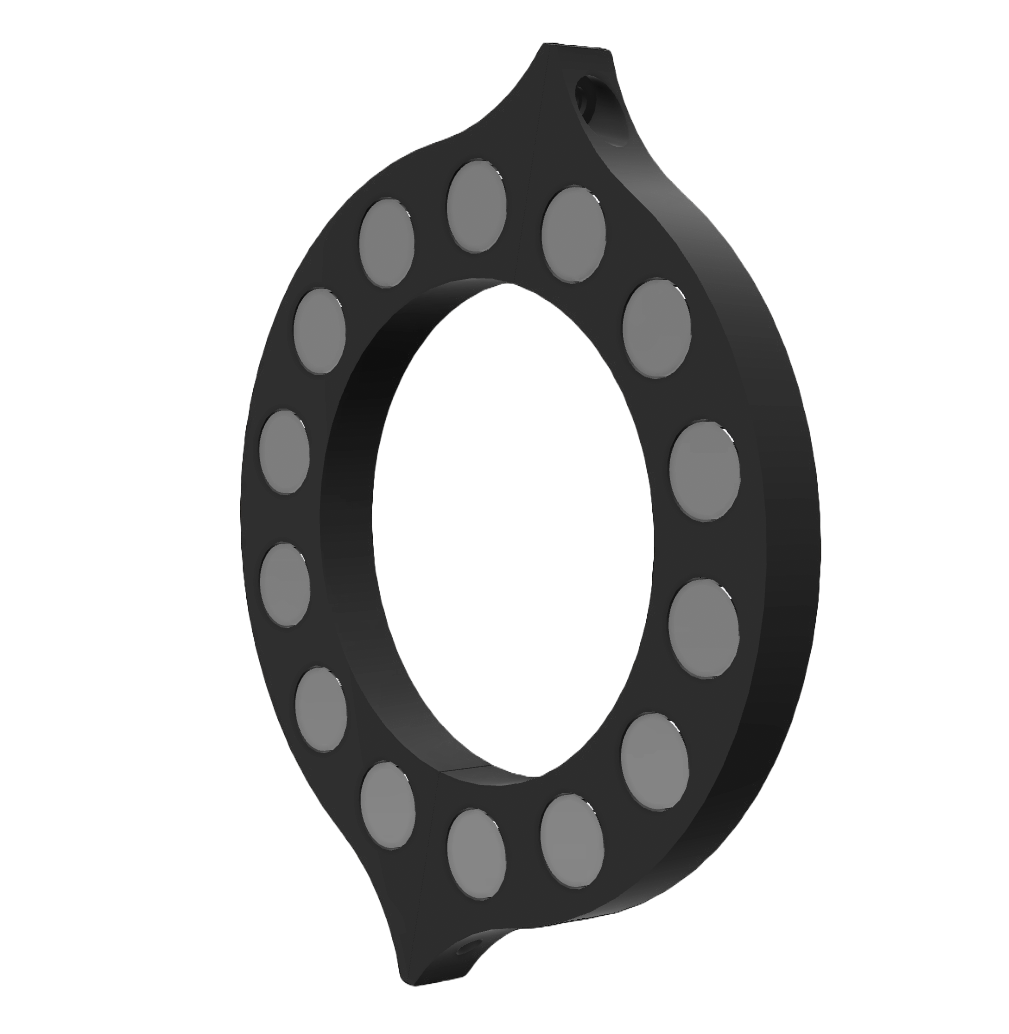
Assuming a hall effect sensor and a ring of magnets similar to the one shown in the photo is present, the Arduino can measure and display a speed reading while also keeping track of the cart’s total distance traveled.
Setting the tire size and other cart-specific variables is done using the CartCockpitInit program.
Trip computer
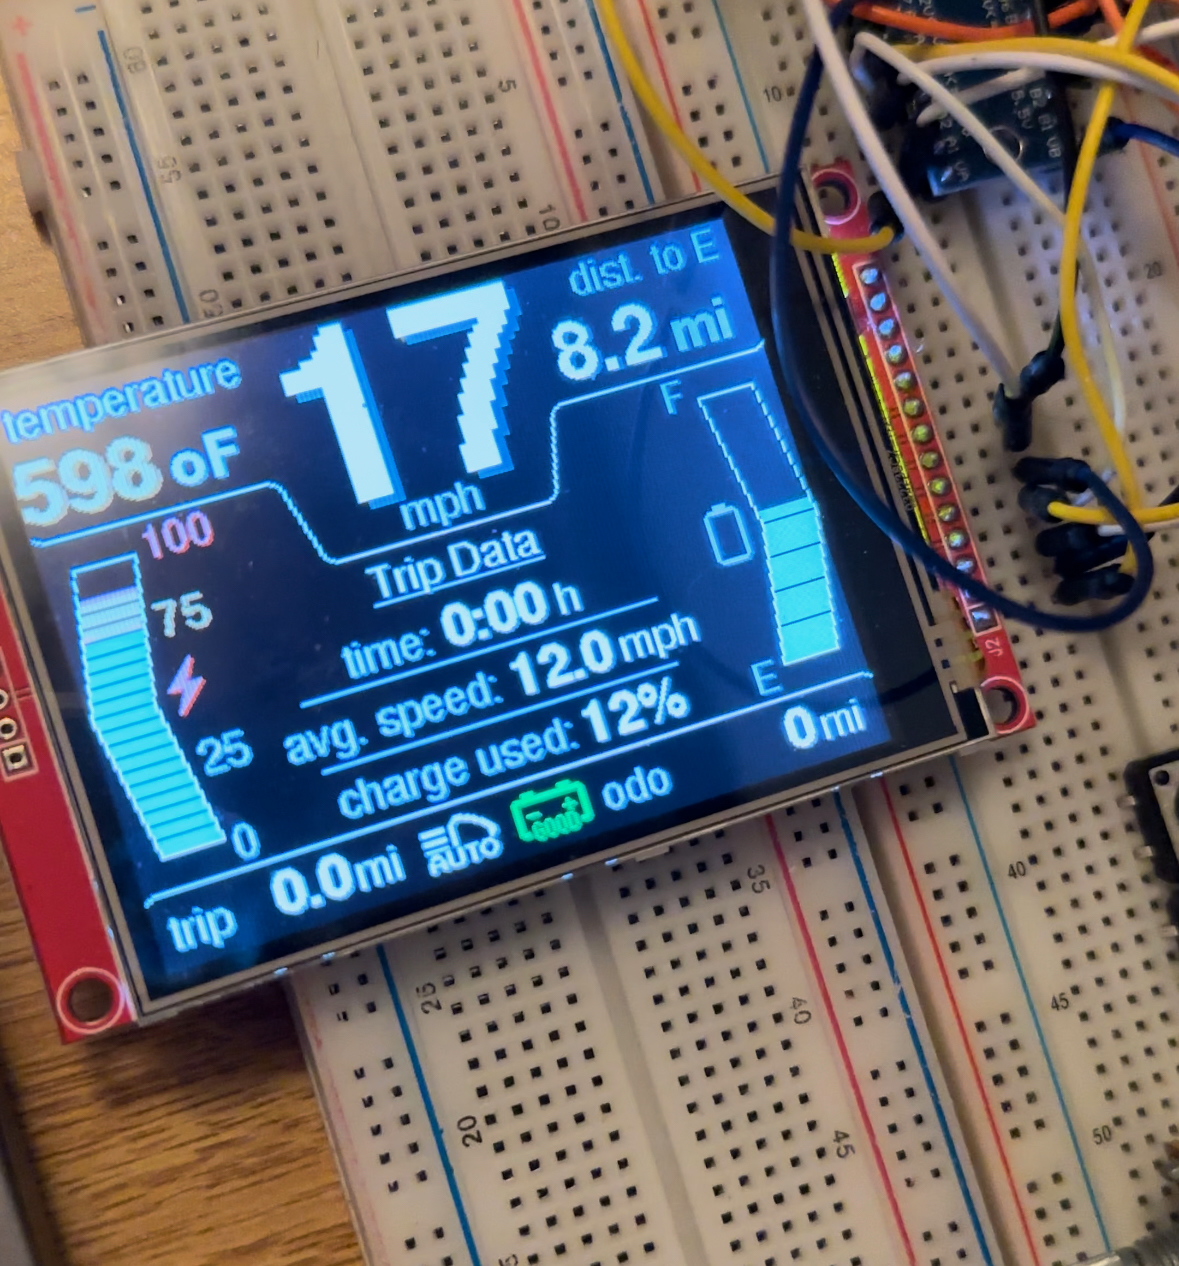
The ‘Trip Data’ screen shows the amount of time, distance, battery charge used, and average speed of the cart since the Arduino (and the cart, by extension) was powered on. CartCockpit can also display a reading of the outdoor temperature provided that a TMP35 sensor is connected to the Arduino, much like the trip computers present in most cars.
Battery monitoring & range estimation
CartCockpit is equipped with a complex battery monitoring system that can monitor the battery’s voltage, state of charge, and health in real time. In addition to this, data from the battery monitoring system can be used to make range estimates that adapt to the way the cart is driven (i.e., driving the cart more aggressively will result in a lower range estimate). The health of the cart’s batteries are shown at the bottom of the display, with the battery glyph displaying in green if everything is in order (shown in the gallery); if the cart’s batteries have a fault, then the glyph turns orange and displays a message to describe what is abnormal (LOW for low voltage, HIGH for high voltage, and SERV for service soon).
Automatic lights
If a photocell and a relay to control the cart’s lighting system are installed, the Arduino can turn the cart’s lights on and off based on the ambient brightness. The user can disable the system and take manual control of the cart’s lights for the rest of the trip (until the cart is power cycled) by pressing the headlight control button (wired to digital pin 5).
Challenges
Unsurprisingly, trying to create a project of this complexity with the simplistic hardware of an Arduino was anything but easy; of the myriad of challenges I faced while developing this project, here are a few that I think are worth mentioning along with the solutions I came up with for them:
Arduino’s limited program space
Anyone familiar with the Arduino Uno and Nano will know that their program space is extremely limited, with both only having a measly 32KB (with the Nano actually having less because it uses 1.5KB of that space for its bootloader). With the amount of functionality being crammed into this project, it wasn’t surprising that I had already begun to run out of space halfway through the project:

To wrangle the ever-increasing size of this program, I took some time and optimized the code; some of the strategies I used during this optimization are:
Using character arrays for strings instead of Arduino/C++’s String object; through some testing I found that a single instance of Arduino’s String object can take up to 240 bytes even if the string is relatively short, not to mention that loading the necessary code for String data types onto the Arduino takes up an additional 1KB of space.
Using the byte data type instead of int for smaller numbers; while this sounds like it wouldn’t make much of a difference (only one byte per number), with the amount of numbers that CartCockpit is keeping track of at once, it actually did end up saving a notable amount of space.
Reducing the size of fonts by getting rid of unused characters; for example, on the larger font used to display the speedometer text, I stripped out all of the non-numeric characters and saved roughly 4KB of program space.
Here are the results of these optimizations:
 Much better.
Custom glyphs
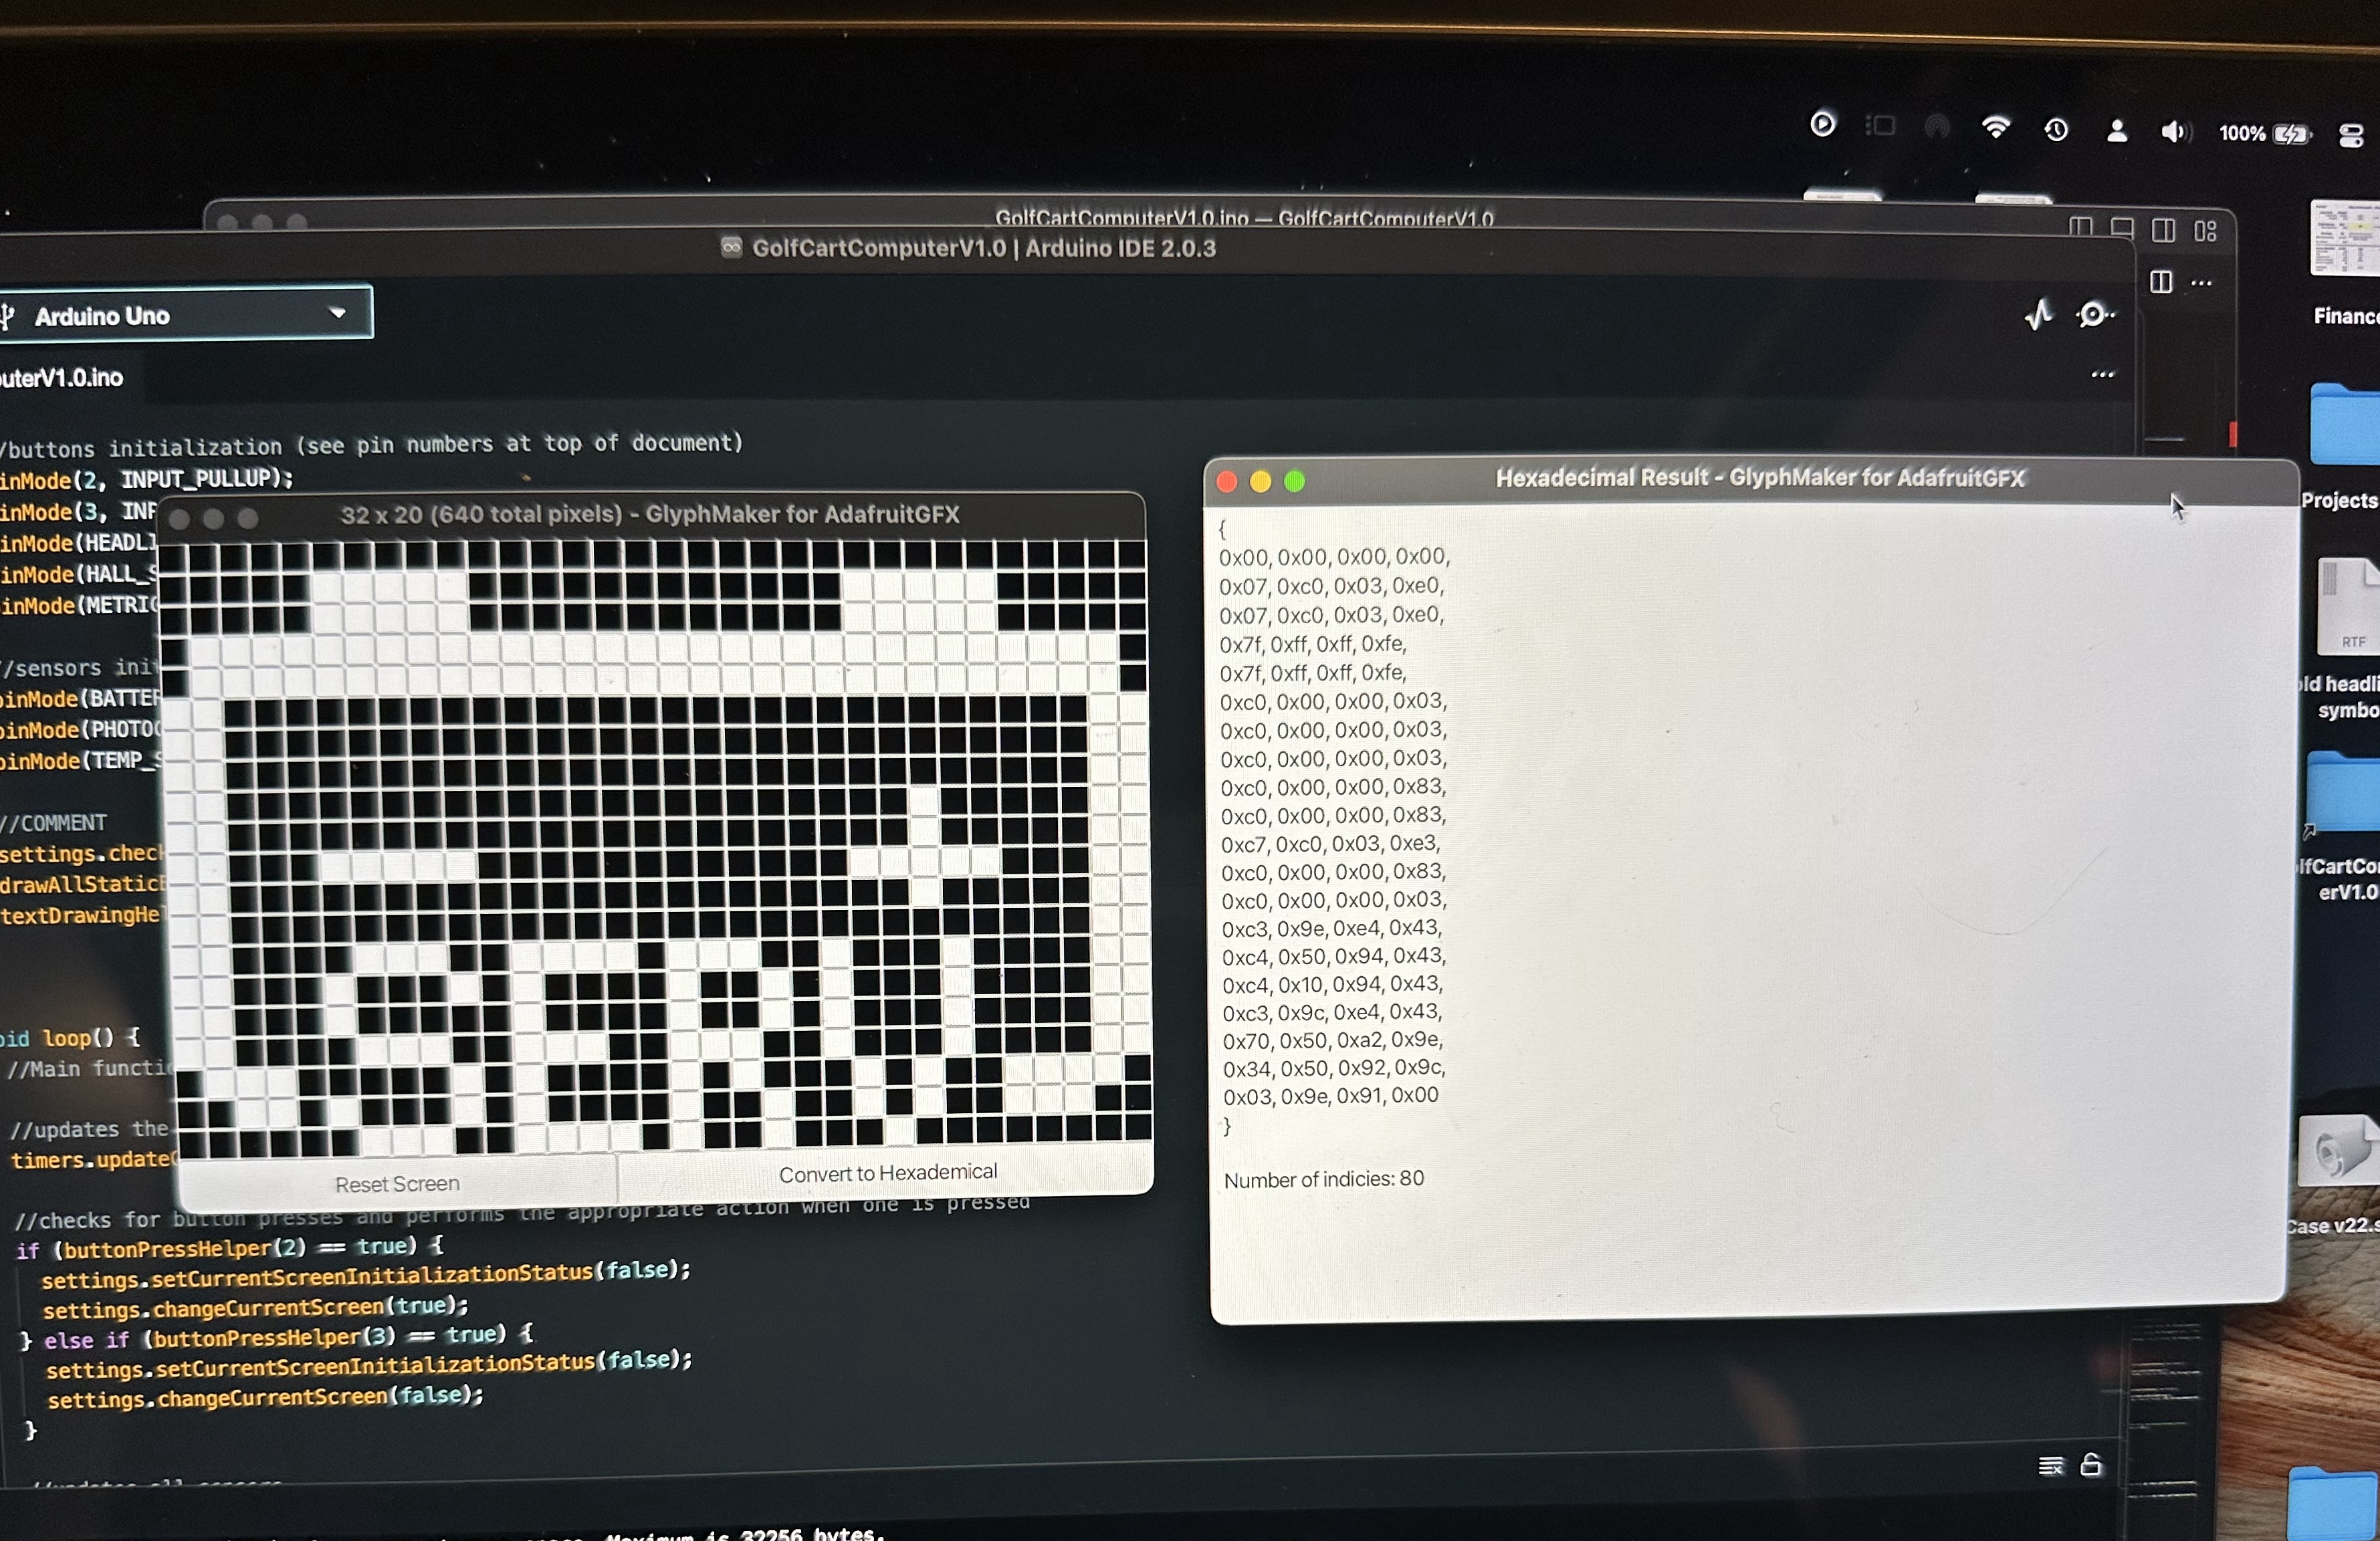
By taking a look at the gallery below, you will notice that there are quite a few glyphs throughout the user interface of CartCockpit; all of these glyphs were designed by me, with the help of a small JavaFX project that I wrote to assist me with implementing them in the Arduino’s code. You can read more about it here.
A screenshot showing the ‘service battery’ glyph being created with GlyphMaker.
Support for multiple unit systems
When programming CartCockpit, I decided that it would be a fundamentally metric device: distances are measured in meters, temperatures are measured in Centigrade, and so on. I did this for two reasons: understanding and working between smaller and larger distances is easier in metric; and while I never expected this to be used anywhere but the United States (or anywhere outside of my house for that matter), I still wanted to ensure that CartCockpit was flexible enough to do so. To achieve this support for multiple systems without having to rewrite all of the code, I created two header files – one for metric and one for imperial – that contain conversion data for both unit systems:
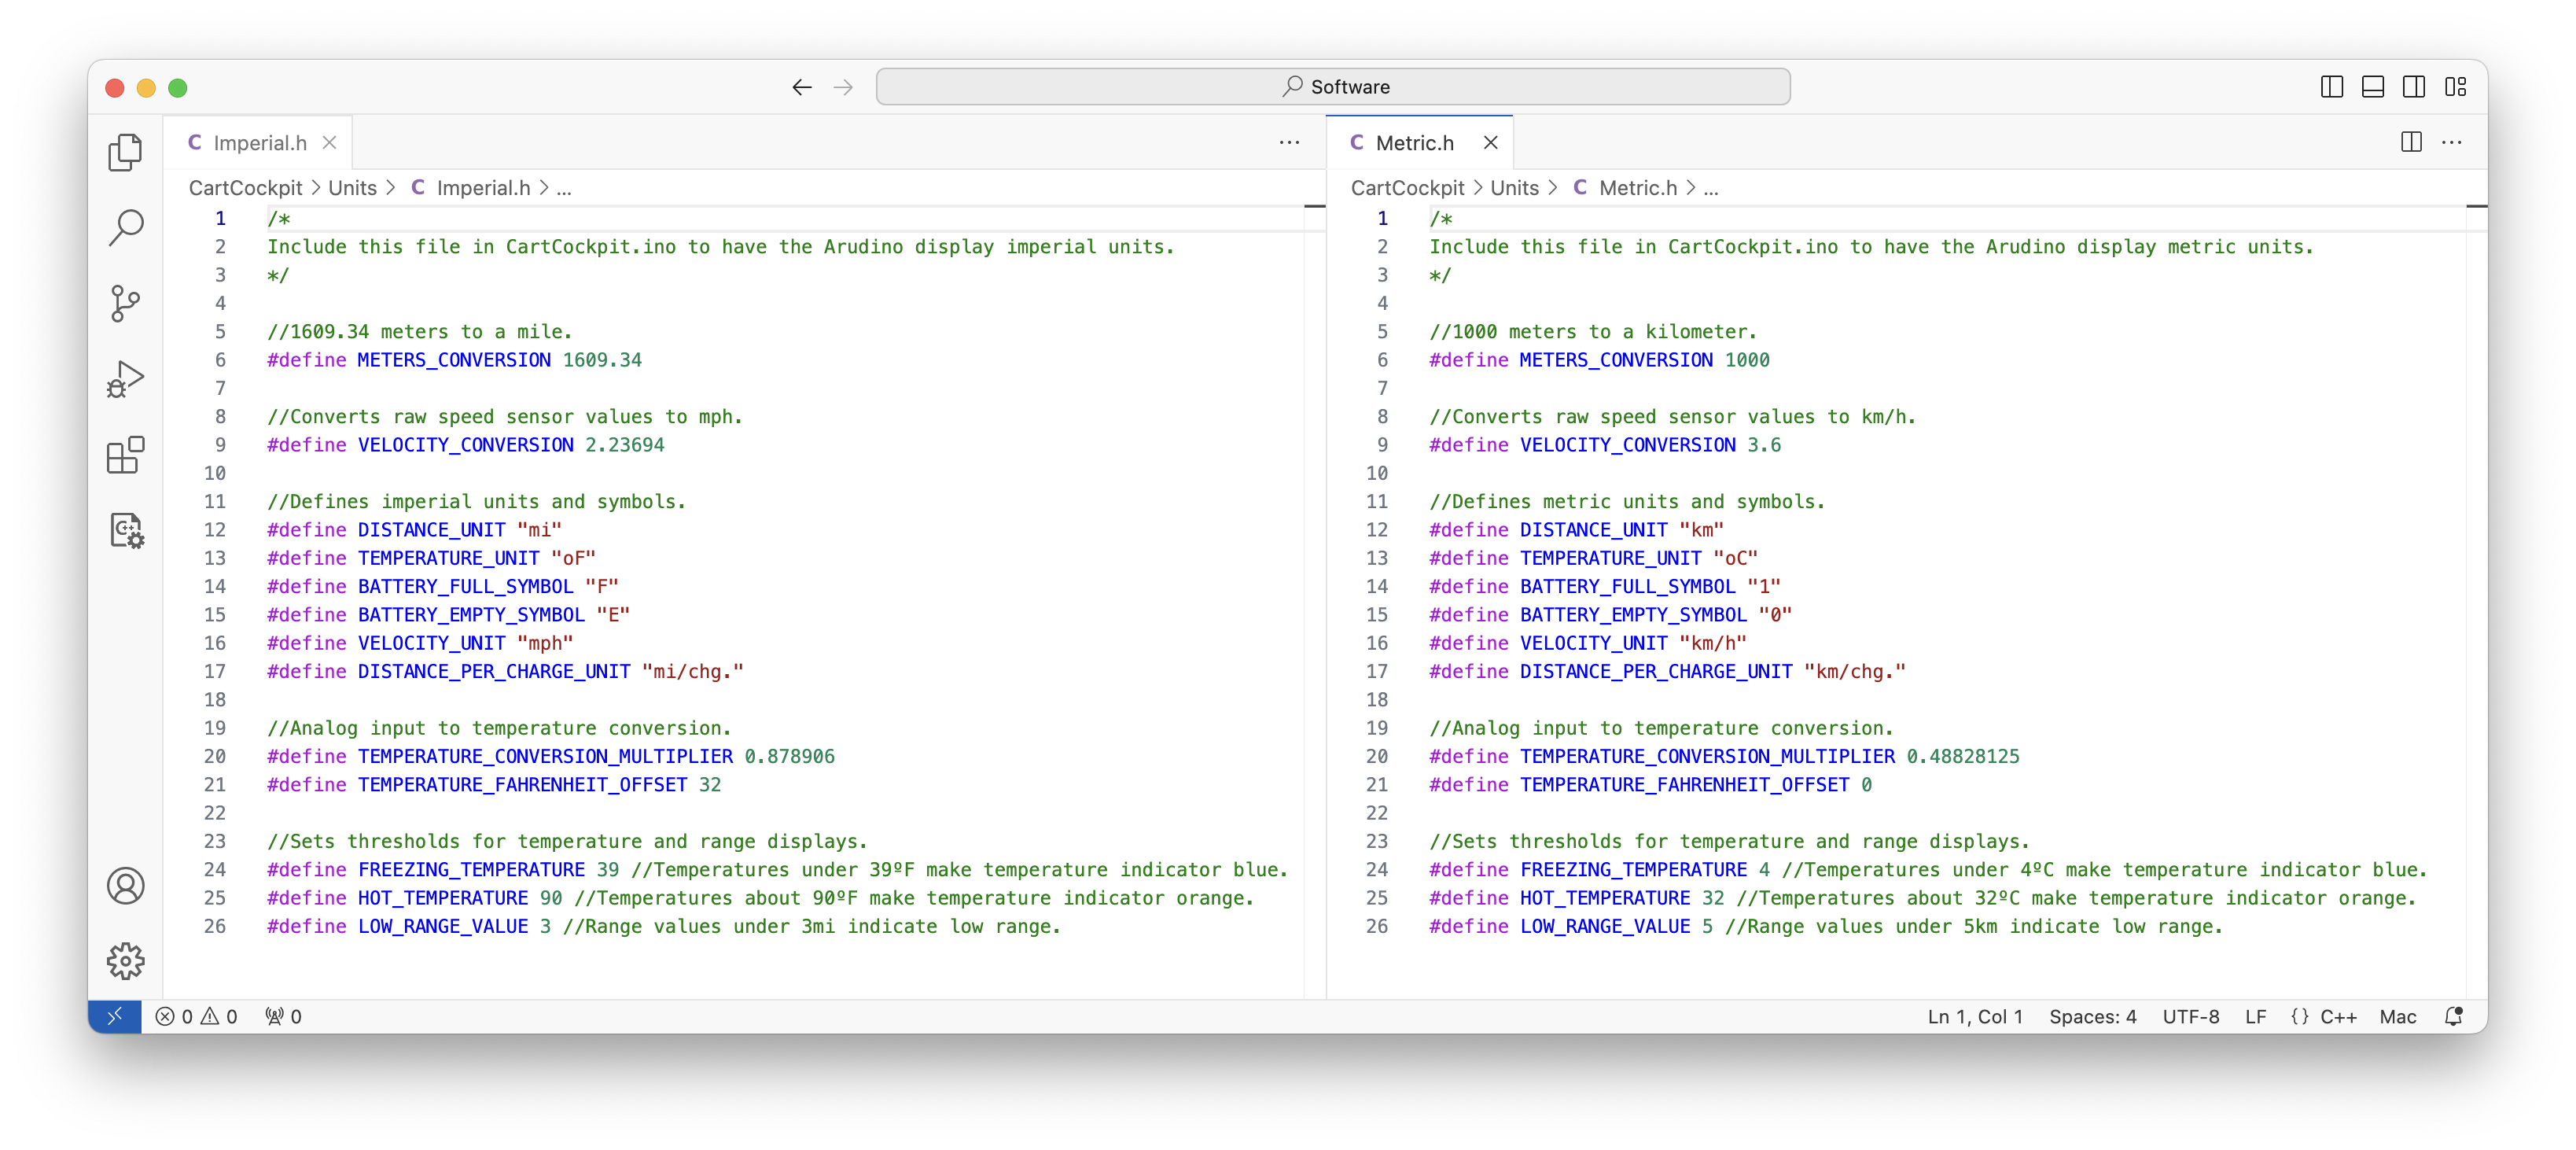
To determine which unit system is used, the user can uncomment the include directive that applies to the desired unit system in the CartCockpit.ino file:
/*
Conversion and unit-specific values (uncomment the desired units file).
*/
#include "Units/Metric.h";
//#include "Units/Imperial.h";
You can see this working in the gallery, where there are two pieces of media that show CartCockpit using different unit systems.
Initializing the software
To allow CartCockpit to be compatible with all styles of golf cart, I leveraged the Arduino’s EEPROM to store some values that are specific to each cart. To initialize an Arduino with this data, I wrote another small program called CartCockpitInit; setting the values to be written to the EEPROM is done by editing the CartCockpitInit.h file, as shown below:
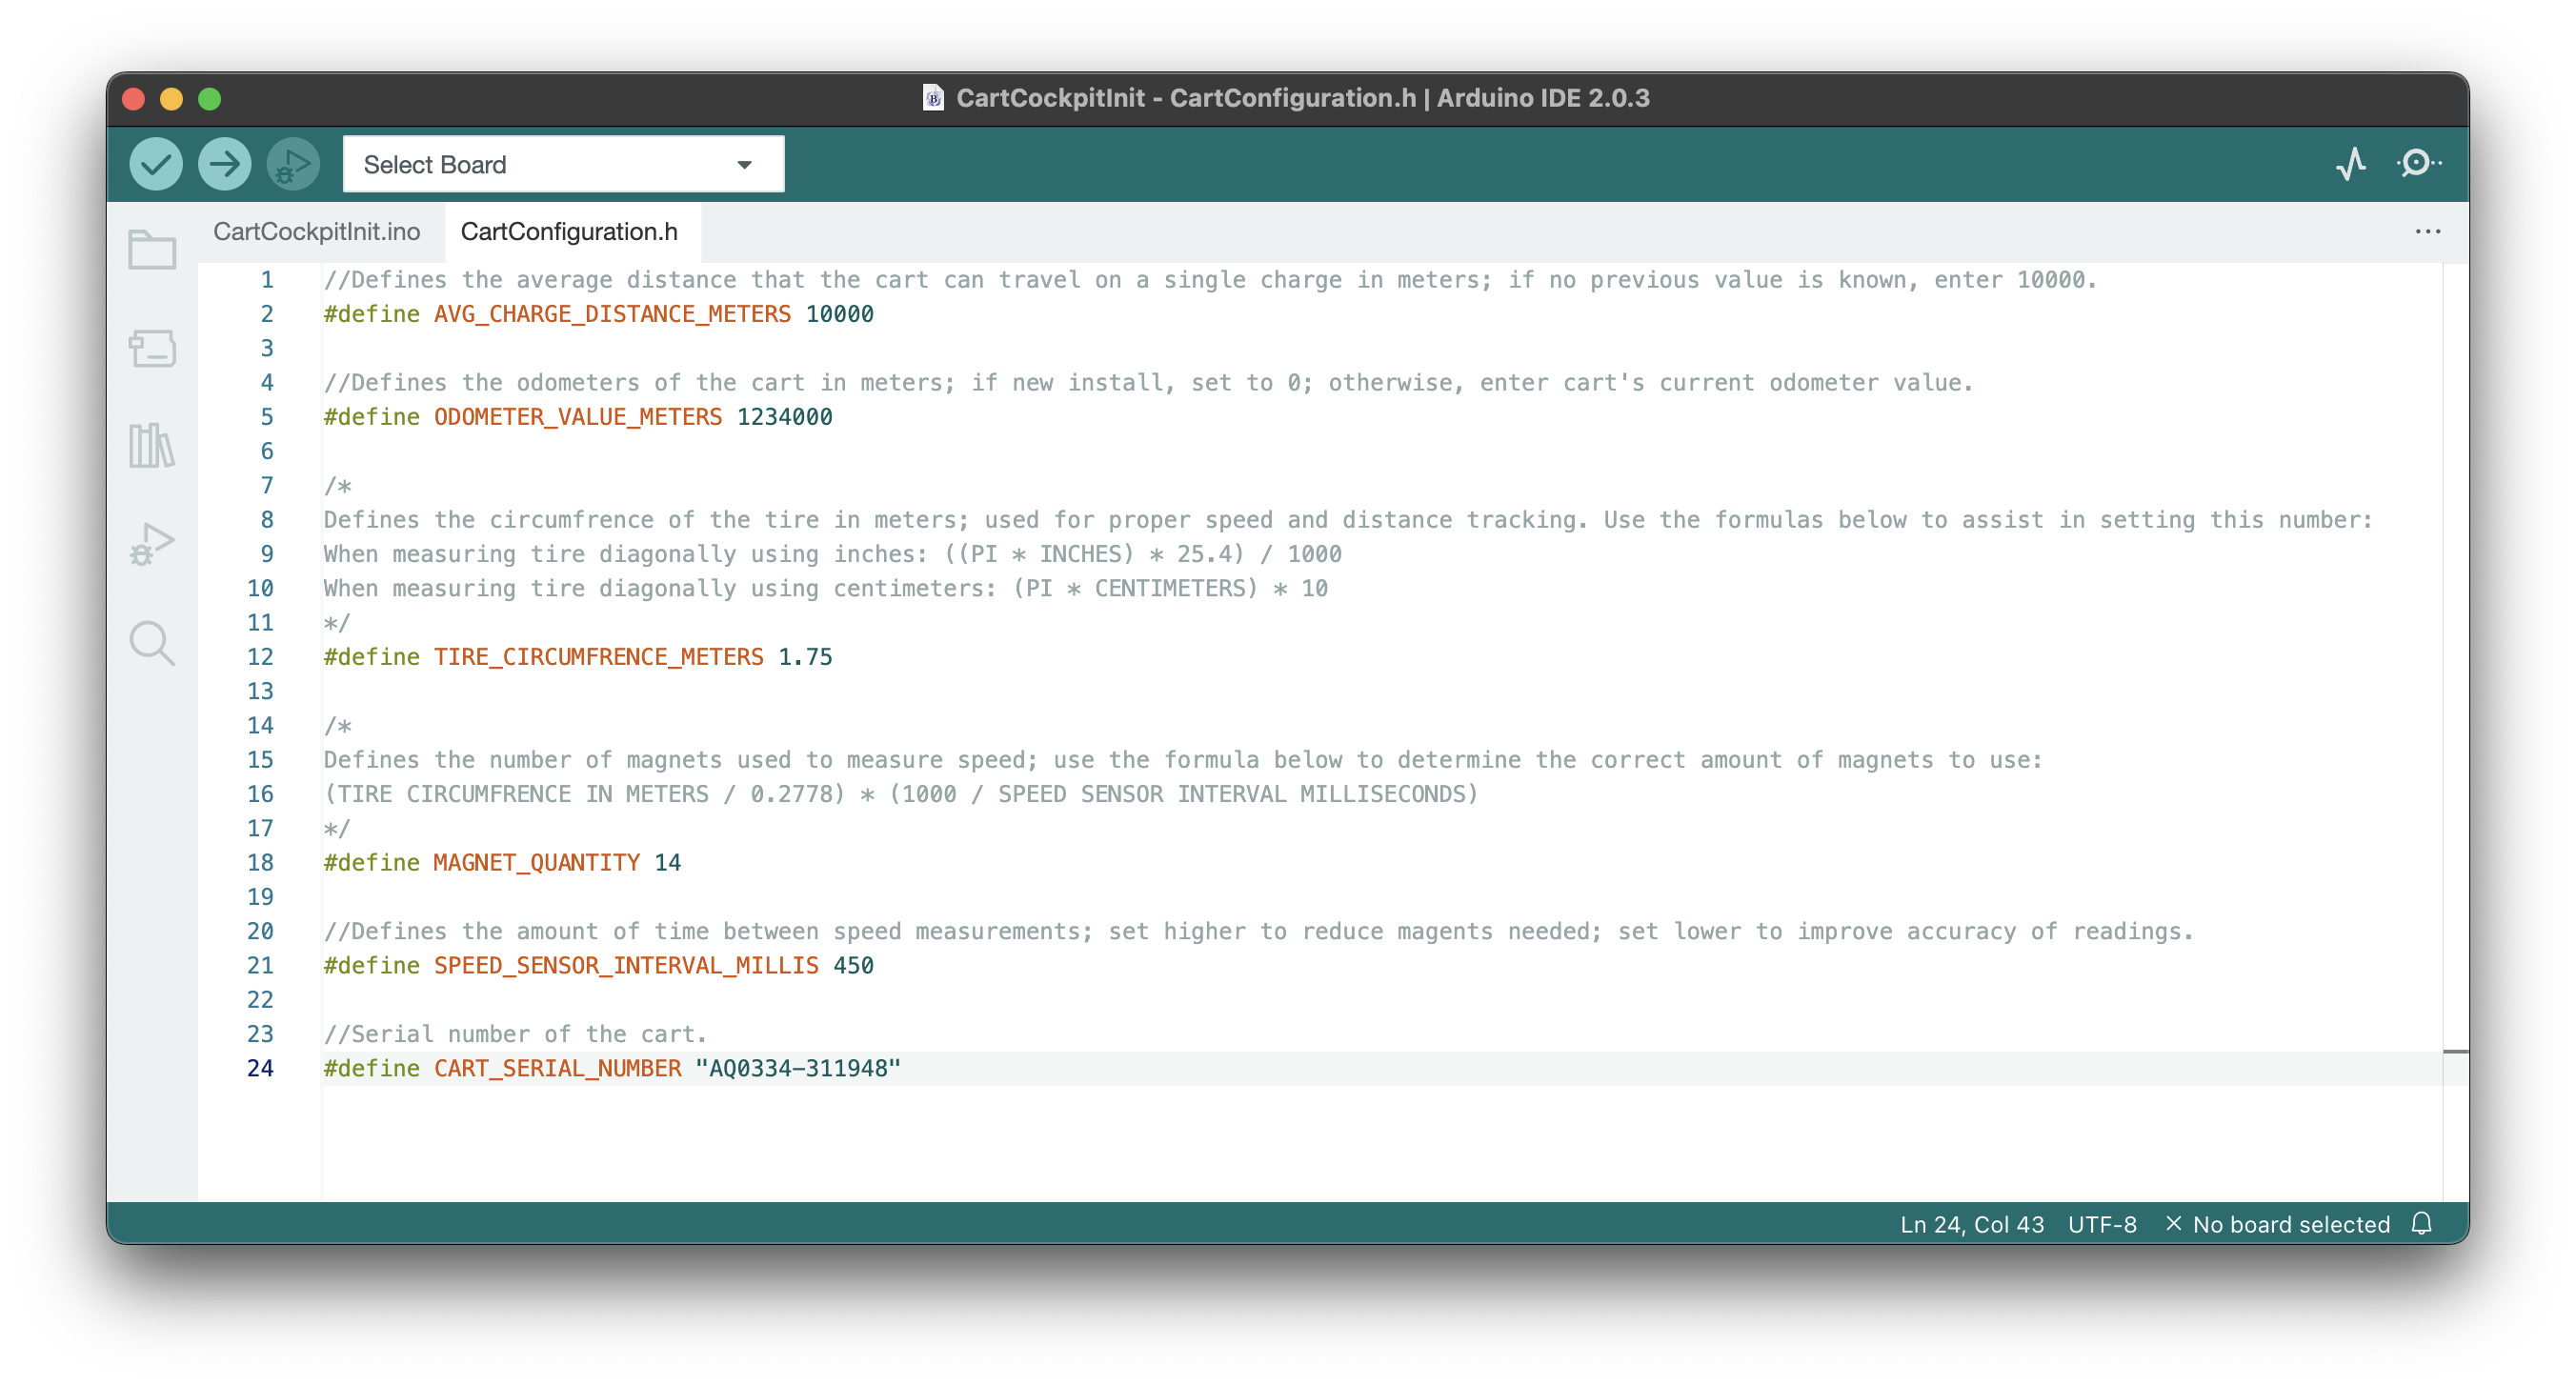
In this file, cart-specific values like the tire size and serial number can be defined; in addition to this, the user can customize the measurement characteristics of CartCockpit by altering the number of magnets present in the speed detection ring and frequency of its speed measurements. Lastly, starting values for its odometer and expected range per charge can be set in the case of this device being installed in a used cart. When the user is ready to write these values, they simply upload the CartCockpitInit.ino file to the Arduino, and then re-upload the CartCockpit software.
Gallery
Unfortunately, I did not take a lot of pictures of CartCockpit while I was developing it, so I am limited to only showing these; hopefully when I get more time, I can reassemble my prototype and take some better pictures and videos.
Screenshot of ‘Trip Data’ screen
The temperature value is displaying the absurd value of 598ºF because the TMP35 sensor was not connected when this photo was taken.
Video showing all screens
Some of the values are a bit erratic because the potentiometer that simulates battery voltage was not connected when this video was taken; during normal usage these values would update in a smoother, more stable manner.
State of This Project
After working on this project over several months, I planned to install a working prototype into a golf cart that my parents have at their vacation home during the Summer of 2023; unfortunately, due to the limited time I had with the golf cart, as well as time constraints regarding my departure for school, I ended up running out of time to complete the installation. While most of the features of this golf cart have been tested individually in the prototyping environment, they have yet to be tested all together in an actual golf cart. I have made the source code and schematics for this project available on GitHub in hopes that someone with more time, resources, and/or knowledge takes an interest and manages to come up with a way to install this. Even though I was unsuccessful in getting to see it work and use it in a real setting, I’m still happy I took on this project, for it taught me a lot about C/C++, Arduino, and low-level programming.


